iOS 5 Tip: Custom Vibrations
October 8, 2011
IOS 5 is coming! iOS 5 is coming! And with it, a lot of people will have questions on how to enable this or that new feature.
[UPDATE: at this point, custom vibrations as set within each contact seems to only be for calls from that contact. Not for text messages or other notifications. This is very unfortunate …]
It may be confusing to turn on, create, and assign custom vibration patterns to different contacts. Here goes …
First, you need to turn the custom vibration patterns feature on. Go to Settings / General / Accessibility and scroll down to the Hearing portion. Flick on the option for “Custom Vibrations.”

Next, go to Settings / Sounds. Flick on both Vibrate options, then scroll to the bottom till you see “Vibration Patterns.” (NOTE: you won’t see this “Vibration Patterns” option if you haven’t turned on Custom Vibrations inside the Accessibility settings.)


Tap “Vibration Patterns” and you’ll then see a list of different vibration patterns. You can pick one of these or create your own.

What you select here will then become your default vibration pattern for the various alerts, unless you pick a different vibration pattern for a specific person.
Here, too, you can easily create your own patterns – i.e., three bursts of vibrations lasting 1/4 second each, or one long burst of vibrations lasting two seconds, or however you want it. Just tap on “Create New Vibration” and then you’ll see this screen with two greyed buttons, “Play” and “Stop.”

Press anywhere in the empty space where it says “Tap to create a vibration pattern” and you’ll feel vibrations lasting as long as you press down. Lift up, then press down and the vibrations will stop then resume. Then press “Stop,” and lo and behold, you’ve created your first custom vibration pattern! Press “Play” to play it back, “Record” to try again, “Save” to save this pattern (you’ll be asked to name this pattern), or “Cancel” to return to the previous screen.
You’re now ready to assign vibrations to specific persons! Here goes …
Head over to the Contacts app and tap the name of someone to which you’d like to award a custom vibration pattern. When viewing that person’s contacts details, tap “Edit” and scroll down to “Vibration.” (NOTE: your contact might not show this field unless you tap “Edit.”) Tap “Vibration” and then you can pick the vibration pattern you want to assign or even create a new pattern.

There you go! Have fun. Knock yourself out.
Deafening your iPhone: Jailbreak apps
July 6, 2011
Ok, folks. As of right now, it’s easy to jailbreak your phone. Just update to iOS 4.3.3 via iTunes then go to jailbreakme.com. Done? Good.
(Jailbreaking is reversible and basically legal. And what jailbreaking basically does is install an ‘alternate’ app store named Cydia that’s full of thousands of apps, tweaks, and themes that Apple would not have approved.)
Here’s a list of apps I bought and/or downloaded from the Cydia app that makes my iPhone 4 MUCH more deaf-friendly:
Vibrafications – set up custom vibrations for different actions (SMS versus mail versus Twitter / Facebook notifications). Vibrations can be of different patterns and lengths. You can even set up custom vibrations for different people!
3G Unrestrictor – make it possible to use FaceTime and several VRS apps over 3G, not just wifi. Came in handy when I needed to call AAA for service.
Notified Pro and Notification GriP – set up “quiet” notifications on the top or bottom of the screen and which does not interrupt your work or play. No more intrusive iPhone notifications in a box in the middle of your screen. So many freaking options to customize these whichever way you want!! A definite MUST-have for me. More on this on a later blog post. (EDIT: I use the PushMail app – from the regular app store – to send me push notifications whenever I get new email. Similarly, I use the free Boxcar app to send me Twitter notifications.)
LockInfo – extensively customize the lock screen to show a variety of information. I have this set to dim after 5 minutes and to display emails, SMS messages, and notifications. So that means I can just glance at my iPhone at least once every 5 minutes to see if I have new messages instead of having to frigging turn it on and checking different apps. LockInfo comes with numerous plug-ins as well to display even more info – calendar, Twitter, to-dos, etc.
BiteSMS – send and receive SMS messages in a small window on your screen from inside any app or the lockscreen. No need to switch to the Messaging app. Wish there was something like this for mail messages!
These are just a handful of handy jailbreak apps I use to make the iPhone a vastly better experience for me as a deaf person. I know – iOS 5, announced for release this fall – does nearly all these (except for BiteSMS). Where do you think Apple got its ideas?
In addition to these, I use quite a few more jailbreak apps to improve the overall experience, like SBsettings (quick access to common Settings), Snappy (quick photo-taking), MyWiFi (ahem, using my iPhone as a wifi router for laptops or iPads when on the road), InfiniDock (having more than just 4 apps on my dock bar), FolderCloser (close a folder upon launching an app), and many more.
Go forth and jailbreak!
Greater Access to San Francisco: Tweeting Complaints
June 2, 2009
San Francisco continues to keep up its uber-geek credo: it will now accept complaints from people via Twitter. Just follow @SF311. Can even post photos via TwitPic.
Damn. This is terrific for deaf folks living in or visiting San Francisco. Hope Frederick, Maryland will do the same soon. I do know that several city and county commissioners in and around Frederick, MD are tweeting via Twitter. But an official Twitter account like @SF311? Priceless.
Any other towns / cities / counties accepting complaints via Twitter?
(Thanks, TechCrunch)
VPAD+ Accessories
February 23, 2009
Now you’ve got your uber-cool VPAD+ from Viable. Now you’ve got to put it someplace!
Clear View Innovations — otherwise known as CVI Gear — has three mounts and stands for the VPAD+ which may help you decide. All three are useful for freeing up space on your desk or counter, and for raising the VPAD+ to eye level.
![]()
The CVI Flexarm Mount is a doo-hickey that clamps to the edge of a kitchen counter or desk, and has a flexible arm that can be bent one way or another.

The CVI Pivot Mount is similar to the Flexarm Mount in that it clamps to the edge of your kitchen counter or desk. It has a longer and straight arm that has a 360 degrees pivot for eye-level communications.

The CVI Table Stand can be put onto a table without having to clamp it to an edge. And you can quickly move the VPAD+ and stand to another location.

All three products are made to order. So if you want to hang your VPAD+ from up high, say from the top edge of your armoire or bookshelf, the manufacturer can make a “reverse” mount to make this easier for you. All three products are $99.99.
Speak Starbucks-speak!
June 10, 2008
If you’re like me, you have to write down your Starbucks order. Luckily, just about every Starbucks barista has been trained to press the “feed” key on the receipt printer and give me a slip of paper and pen even before I need to ask for it. But then I spend what feels like a minute scrawling down my entire order. Even more time when I’m ordering for several people. And then I see the barista scribble the entire order into a few letters on each cup.
I’ve always wanted to learn the Starbucks language. And now, thanks to Adam, here’s a list of the symbols, letters, and numbers that Starbucks baristas use when writing down your order — and that means you and I can just jot these down and give the barista our order.
“Venti iced X 2 TN N WC(with slash) M” — ahhh, that felt sooo good.
When using letters / numbers from this list, I’ve noticed that baristas tend to follow a particular order: first, let them know the size (venti etc), then whether it’s iced, then decaf, then shots, then syrup, then milk, then custom, then finally the drink itself.
I’ll update this list as I get more information, and/or move this to a separate page.
Happy imbibing! And tell me in the comments what your favorite drink is, in Starbucks-speak.
DECAF:
(none) – regular strength
X – decaf
1/2 – half / half
SHOTS:
(none) – the standard
1 – single
2 – double
3 – triple
4 – quad
5 – 5 shots
6 – 6 shots
SYRUP:
(none) – none for me
V – vanilla
H – hazelnut
TN – toffee nut
C – caramel
P – peppermint
A – almond
R – raspberry
SFC – sugar free caramel
SFH – sugar free hazelnut
SFV – sugar free vanilla
1PV – one pump vanilla (you can add 1P in front of any of these syrups like 1PR, 1PSFH)
2PV – two pump vanilla (you can add 2P in front of any of these syrups like 2PA, 1PSFV)
MILK:
(none) – the standard
2% – 2% milk
1% – 1% milk
N – nonfat
S – soy
O – organic
B – breve
CUSTOM:
(none) – none
R – room (space on top for you to add milk yourself)
R (with slash thru it) – no room
WC (with slash thru it) – no whipped cream
WC – with whipped cream
XH – extra hot
XF – extra foam
F (with slash thru it) – no foam
D – dry
W – wet
XD – extra dry
CR – with caramel sauce
2/3 full – 2/3 full
DRINK:
L – latte
M – mocha
A – caffe americano
BC – brewed coffee
PM – peppermint mocha
WM – white chocolate mocha
C – cappuccino
E – espresso
CH – Tazo chai tea latte
HC – hot chocolate
WHC – white hot chocolate
PHC – peppermint hot chocolate
CM – caramel macchiato
EM – espresso macchiato
CDL – cinnamon dolce latte
GL – gingerbread latte
SFGL – gingerbread latte with sugarfree syrup
SFCDL – cinnamon dolce latte with sugarfree syrup
PSL – pumpkin spice latte
CAS – caramel apple spice
VCR – vanilla crème
BT – iced black tea
PT – iced passion tea
GT – iced green tea
PTL – Passion iced tea lemonade
GTL – Tazo green tea latte
CF – coffee Frappuccino blended coffee
CRF – caramel Frappuccino blended coffee
MF – mocha Frappuccino blended coffee
STCF – strawberries and crème Frappuccino blended crème
VBF – vanilla bean Frappuccino blended crème
CFL – coffee light Frappuccino light blended coffee
CRFL – caramel light Frappuccino light blended coffee
EGF – eggnog Frappuccino blended coffee
PMF – peppermint mocha Frappuccino blended coffee
CHCF – Tazo chai tea Frappuccino blended crème
DCCF – double chocolate chip Frappuccino blended crème
JCF – java chip Frappuccino blended crème
VBFL – vanilla bean light Frappuccino light blended creme
SnapVRS / Ojo Also Offers 9-1-1 Calling
June 3, 2008
Since May 19, SnapVRS has been making it possible for callers to be connected to 9-1-1 just by dialing “911” on their Ojo videophones. Sorenson began doing that last year, and Viable just yesterday. Good move, SnapVRS, even if it’s being mandated by FCC!
Callers would have to provide the address where emergency services are needed. I find it interesting that Sorenson has paired with another company to trace your IP address to where you are calling from. I wonder how accurate that is — and whether that company has access to more detailed information that makes it possible to link IP addresses to actual street addresses or if (like SnapVRS and Viable) the caller still must provide his/her address.
Most deaf folks I know haven’t used a TTY in years — rather, they just use videophones as well as text-based relay services through the Internet or via their pagers. But they still kept a “landline” phone line with a TTY next to it. For for? Ah, for emergencies! They needed a way to call 9-1-1, and having the TTY and phone ready was a way to make sure they’d get an ambulance or police over whenever they needed it. (Now, if only these 9-1-1 emergency providers will always respond to TTY calls …)
Viable VRS will soon be able to connect you to your local 9-1-1 emergency service provider. All you would need to do is dial “911” on ViableVision or your VPAD and click on “VRS.” If you’re using a different videophone, you would be able to dial the full address as following — please be sure to save this at the top of your contacts list!
- Dialing 911 or 911.ViableVRS.tv via Viable Vision and the VPAD
- Dialing 911.ViableVRS.tv via D-Link DVC-1000, Sorenson VP-100, or the Ojo
- Dialing ecall.ViableVRS.tv via Sorenson VP-200
NOTE: This 9-1-1 emergency service is not yet “live” — I’ll let you know when Viable begins providing this service.
I previously blogged about Sorenson providing 9-1-1 services a year ago. Good to see another VRS provider getting into the game, even if it’s being mandated by FCC. I’ll also let you know when other VRS providers begin providing 9-1-1 services as well.
Now, my question is: if you’ve got high-speed Internet and a videophone (or several videophones!) at home, do you even need a landline phone line installed in your home nowadays?
EDIT (6/3/2008): Viable just released a video explaining this new service. Carla Mathers is featured in this video — good job, dear Carla!
Yahoo Mail re-designed to work with screenreaders
November 23, 2007
I work with several people with visual impairments, and it has been an eye-opening experience (weak pun intended) for me to watch them work on computers. The things I take for granted — quickly steering the mouse to the exact button and then clicking on it — becomes a labor for some of them. One uses a screen-reader, and tabs from button to button or from text to text and listens until she finds the right button she needs (assuming, of course, the button has text on it with exactly what the button does, rather than just a mysterious “Click Here”). Websites I’m totally used to suddenly becomes a mysterious landscape when viewed through screen-readers or magnified 10 times.
![]() And so it’s encouraging when I read that Yahoo Mail has made its classic interface (not the new AJAX-y drag-n-drop interface) more accessible to people who use screen-readers. I have not figured out yet exactly what has been changed, but it may be that frames (long the bane of screen-readers) have been eliminated in favor of columns that can more easily be scanned by screen-readers.
And so it’s encouraging when I read that Yahoo Mail has made its classic interface (not the new AJAX-y drag-n-drop interface) more accessible to people who use screen-readers. I have not figured out yet exactly what has been changed, but it may be that frames (long the bane of screen-readers) have been eliminated in favor of columns that can more easily be scanned by screen-readers.
Good for you, Yahoo! Gmail, when will you do this?
(Thanks, DownloadSquad!)
Voice messages to text — for free
October 31, 2007
 I’ve previously blogged about options for voice messages to be converted to text to be emailed or SMS’ed to you. (See my reviews or mentions of SimulScribe, Spinvox, and Jott.) But this one, folks, is free.
 CallWave provides a suite of “outside the phone” services, and the one that’s of most interest to me (as a deaf person) is its free service transcribing voice messages to text. You can then read the voice message either via email, via a text message, or via a “PhonePage” — your own customized Internet page where you can go through and sort voice messages much like you would like an email inbox.
CallWave even provides a widget that you can put onto your iGoogle, Yahoo, Vista Sidebar, or Apple Dashboard showing your list of voice messages (that you should have already transcribed to text, right?). Very useful, very convenient. And for free. Waitamin, I just caught something — it’s free during its beta period. Ohhhh.
CallWave provides several other services — some at a low monthly fee — like virtual faxes and voice mail on your computer.

Easiest way to subtitle and show your videos: Overstream + Google Video
September 17, 2007
(EDIT 8/28/2008: YouTube now supports the ability to import .srt and .sub files as well.)
Heads up: a new subtitled bonus video at the end of this blog post — this time, of my younger daughter walking for the first time!
 Four months ago, I told you about Overstream, a website where you can easily add subtitles / captions to your videos. Several of you (including myself) mentioned that while this website was wonderful, there wasn’t a way to move your captioned videos from one site to another.
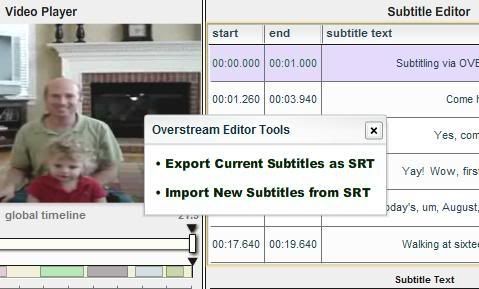
I’m happy to tell you that Overstream now has made it easy to export your captions / subtitles to other video-hosting websites.
Max, the creator of Overstream, recently added a feature where you can save your subtitles as a “.srt” file. An SRT file pretty much just contains your subtitles and the times in hundreds of seconds that they are to appear (and then disappear) in your video. I believe SRT files are similar to what is being used by major television and movie producers, but I could be wrong. And I also believe this is similar to what rather complex subtitling computer programs create — like Subtitle Workshop and MAGpie.
Anyhow, on Overstream, after you’re finished creating your subtitles, you can then click on “Tools” to see an option for exporting current subtitles as SRT. Click on that option, and then you’ll get an option to save the subtitles as a file on your computer or copy all the subtitles (and time codes) to your clipboard. (Hey Max, yet another suggestion: can you add buttons to allow the user to move the current video frame back or fro a half second, a second, and five seconds? I found myself constantly re-positioning the arrow showing the current video frame.)
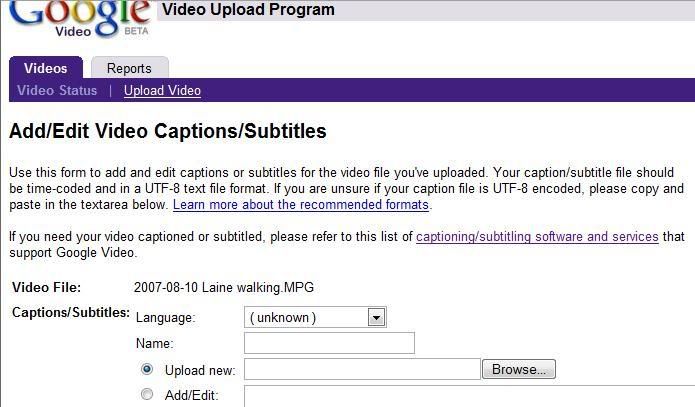
![]() Last July, I told you how Google had added a feature where you can upload “.srt” files which is used to add captions / subtitles to videos. This is where you can import the SRT file you created with Overstream, or even paste the subtitles into a special text box.
Last July, I told you how Google had added a feature where you can upload “.srt” files which is used to add captions / subtitles to videos. This is where you can import the SRT file you created with Overstream, or even paste the subtitles into a special text box.

And thus, I was able to easily subtitle my 21-second Google video of my younger daughter walking for the first time! Here’s a quick step-by-step guide on how I did this:
- Upload my video to Google Video
- Go to Overstream.net and create a new Overstream (series of subtitles) using my new Google Video as the base video
- Export the subtitles (via the Tools button on the Overstream Subtitles editing screen) to a SRT file on my computer
- Go back to Google Video, and view my “Uploaded Videos“
- Click on the “Add” button next to “Captions / Subtitles” for that video
- Upload my SRT file to Google Video
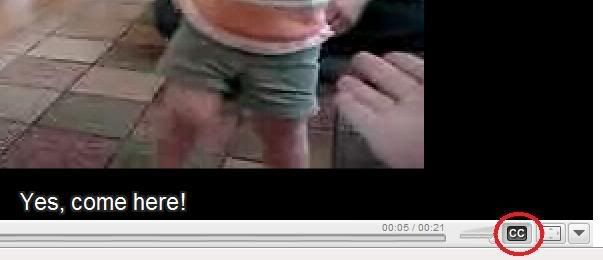
- … and hey presto, the video is now subtitled!
A huge benefit of using Google Video and an uploaded SRT file is that the subtitles can be turned on or off (!!!) using the “CC” button at the bottom of the video screen. The subtitles appear just below the video itself. Doubling the size of the video or making it full-screen still makes the subtitles look sharp — the subtitles aren’t stretched and distorted, but rather the font size is increased by Google Video. Very nice. When the video is embedded on another website, like what I’m doing below, the captions seem a bit small — but that seems to be a Google Video issue and not Overstream’s.
The SRT export functionality brings the Overstream – Google Video duo to the top of my list of recommended sites to use to caption your video. Thanks, Max, for listening to us and adding this super-duper-terrific functionality! Makes me think — it’s not easy for a sitemaster like Max to allow users who create media on his site to take this media elsewhere, so I really appreciate the new Export SRT file feature that Max added.
What’s that? You want me to shut up now and show you the video? Ok, ok! Without further ado, here’s the video of my younger daughter walking for the first time!

